
Dig Dug 3D
Dig Dug 3D's Voxel system
Why Utilize a Voxel System?
In the original game, the player can move in any cardinal direction. If they come into contact with dirt, then they dig through it moving at a slower pace. The colorful pixels that make up the ground change color to black, showing that a tunnel has been dug out. Because the game runs at 30fps, it is hard to see what is actually going on behind the scenes. The game map is divided up into various tiles, which change their graphic depending on what parts of it have been eroded out. The combination of this system with some clever sprite masking that the player undergoes during the digging animation, produces a very convincing digging effect. It produces the illusion that the very pixels are being dug by the player when it’s actually larger tiles that are being affected. Dig Dug 3D takes it a step further, by allowing for full terrain manipulation through the use of voxels that can be individually eroded.

Digging system in Dig Dug (Namco - 1982)
The Basic Data Structure
In order to have an entire map that is able to be shaped as the player digs the voxels, the system must be both simple and robust. It has to be able to support real-time mesh manipulation without using up too much memory or taking too long to process changes in the map.
The game object responsible for terrain generation has the script, “TerrainGeneration.cs” attached to it. The class inside this file, is responsible for holding, modifying, and generating both terrain voxel data and terrain geometry data. At its core, terrain data is stored as a list of chunks ordered from the -xyz corner of the map to the +xyz corner of the map. Each chunk holds voxel data within a 2D array of C#’s BitArray data type, creating a pseudo 3D array of bits. Each bit is like a boolean, having a value of true or false, with true representing the presence of a voxel and false representing the absence of a voxel.
The core difference between using a BitArray vs an array of booleans comes in the form of the memory usage that both data types use. A BitArray allows the storage of 8 entries per byte while a boolean array only allows the storage of 1 entry per byte. In short, utilizing a BitArray allows me to save on 87.5% of the memory usage of representing the entire map through a boolean array. This is significant, especially since the map has a resolution of 9x10x9 voxels per chunk, with the map being made of 8000 chunks. In using a BitArray, I am theoretically using around 810 KB of memory, when I would otherwise be using 6.4 MB of memory. (Note that it is theoretically using around 810 KB, the Bit Array may represent each entry with 1 bit, but it does so in groups of 1 byte, so I may be using between 810 KB - (810 KB + 1 b). This memory efficiency does come at a cost. BitArrays have around half the lookup speed of their boolean counterpart. I was aware of this compromise, however, which was why I organized voxels into chunks in the first place. In using chunks I only process the voxels that need to be manipulated, while still saving a significant amount of memory.
Realtime Mesh Generation
With the simple and versatile system of being able to represent the presence of a voxel via the use of bit arrays and chunks, I could start to procedurally generate level geometry. The 3 components of a mesh that I generate are: vertices, triangles, and normals. Vertices are the points of a mesh that make up a mesh. Triangles are groups of 3 vertices. Normals are vectors that tell which direction of a vertex is “outward.” All three of these components are essential for shaded 3D rendering.
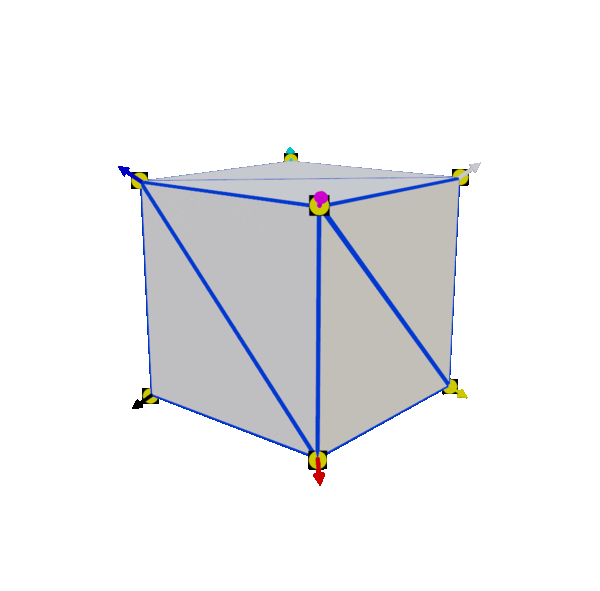
Vertices represented as yellow dots
Triangles represented as blue edges
Normals represented with colored arrows
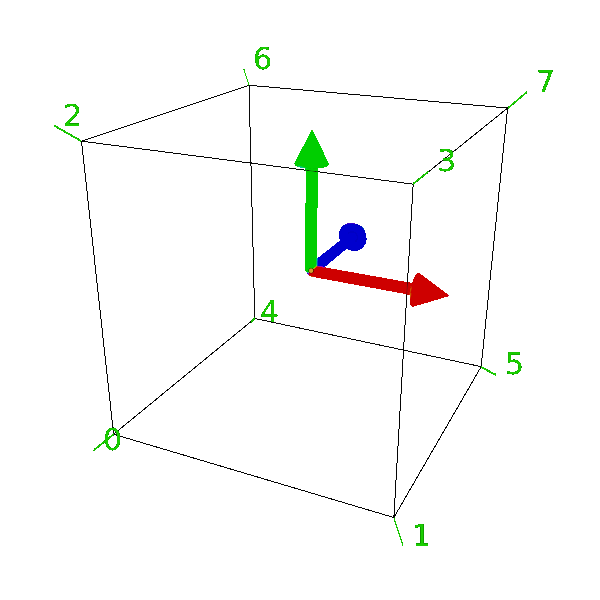
In order to generate a whole chunk’s worth of voxels, I loop through that chunk’s 3D bit array, starting with the most -xyz voxel to the most +xyz voxel. If a voxel exists there, then I first calculate the position that I should be generating that voxel’s geometry at. After I get the location that I should be generating a voxel, I create 8, numbered vertices: one for each corner of the voxel, relative to the voxel’s position in the chunk. I also scale those vertices’ individual distances from the origin of the voxel, based on a size that I set (.2 meters in engine).

The numbers of each vertex allow me to decide which vertices connect to form a triangle, and also which order they are connected. In Unity’s mesh system, vertices must connect in a clockwise fashion to create outward facing triangles. Before I simply connect up the triangles; however, I needed to determine if there is a neighboring voxel or not. It would be wasteful to generate a bunch of triangles that face directly into another voxel, since the player would never be able to see them. This is easy enough to accomplish within a voxel’s own chunk since the data is stored within 3 dimensions; however not all neighboring voxels may be within the same chunk. When analyzing a voxel on the border of a chunk, I first determine whether or not they have a neighbor, and if they do, I get that neighbor from the terrain data’s chunk list. After doing so, I calculate the bordering voxel’s index from the neighboring chunk and see whether it is eroded or not. If there is no neighboring voxel to the face that is being triangulated, we can assume that this face is good for triangulating.
Vertices getting triangulated
After determining which vertices should be triangulated, it is time to generate the normals of each vertex. This, however, is the simplest part of the mesh generation process, as the normal vector of a voxel’s vertex is the same as the positional offset of that vertex relative to the voxel. I ran into a problem at this point. By linking every voxels’ individual faces contiguously, I ended up with smooth shaded voxels. While this produced a visually interesting effect, it caused light to come through the edges of voxels. The solution to this problem, conventionally, is to generate 24 vertices per voxel cube, and triangulate them such that each voxel’s faces remain unattached from each other. This prevents an object’s normals from interpolating between their individual vertices. However, I solved this problem by later writing a shader that would fake lighting.
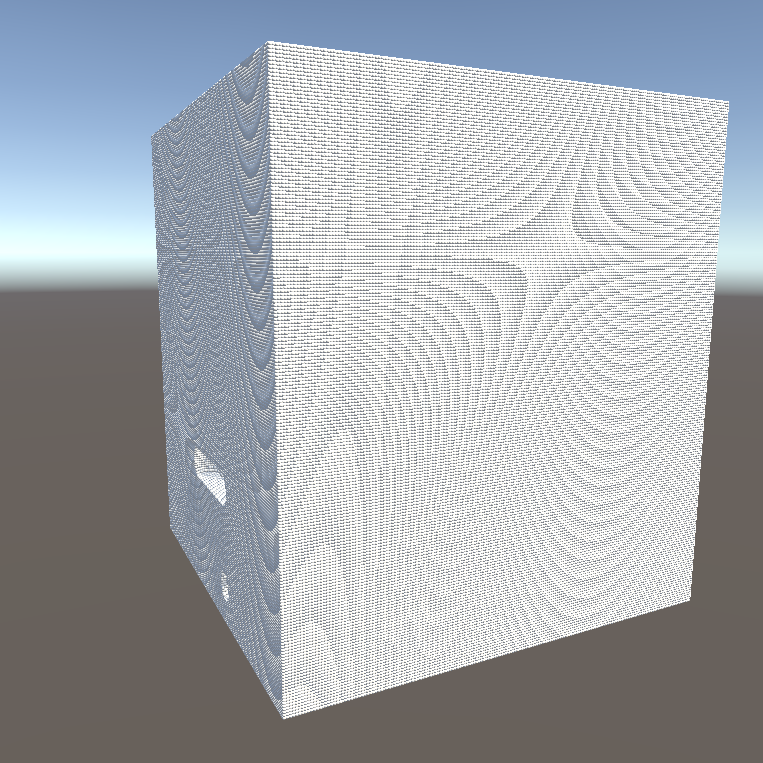
Map with smooth voxels effect allow light to pass through

How flat normals should look vs smooth normals
Red indicates the x component of a normal
Green indicates the y component of a normal
Blue indicates the z component of a normal
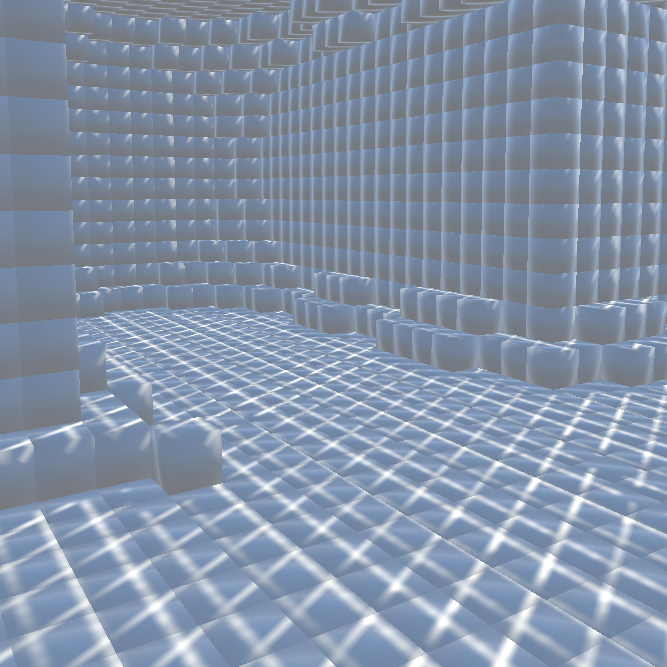
Voxel Erosion
After vertices, triangles, and normals are generated, I use them to generate both the visual mesh and the collision mesh. Mesh generation doesn’t only occur on initial map generation however, it needs to occur whenever the map is modified. Whenever I erode part of the map, either through cave generation, or when the player digs a portion of the map away; the affected chunks need to re-generate to account for the missing voxels.
There was, however, a similar issue to triangulating voxels on the edge of a chunk. Whenever one or more voxels were eroded, it would regenerate only the chunks that they were a part of. This meant that bordering chunks had no idea that their neighbor had just updated. Any voxels on the border of the original chunk would expose missing faces from their neighboring chunks. I solved this issue, that whenever I eroded 1 or more voxels from a mesh, if any of those voxels were border voxels, they would send messages to their neighboring chunks to regenerate.
Oftentimes the map undergoes large changes at once, carving out large spheres of voxels as the player tunnels through the terrain. This is possible, because I only regenerate the affected chunks once per erosion operation. I batch all of the voxel erosion locations into a list, iterate through that list flipping all the affected voxels’ bits to false, and then regenerate the affected chunk and neighboring chunks if necessary. Any erosions that go outside of the bounds of a chunk’s voxels, will attempt to continue into a neighboring chunk should one exist.
Leave a comment
Log in with itch.io to leave a comment.